
Dasar
Teori
Histogram
Diagram yang menunjukkan jumlah kemunculan grey level
(0-255) pada suatu citra
Histogram processing
o Gambar
gelap : histogram cenderung
ke sebelah kiri
o Gambar
terang : histogram cenderung
ke sebelah kanan
o Gambar
low contrast : histogram mengumpul di
suatu tempat
o Gambar
high contrast : histogram merata di
semua tempat
Histogram processing
Mengubah bentuk histogram agar
pemetaan gray level pada citra juga berubah. Histogram Equalization bertujuan mengubah pemetaan greylevel agar sebarannya
lebih menyebar pada kisaran nilai 0-255. Sifat dari histogram equalization
adalah :
o Grey
level yang sering muncul lebih dijarangkan jaraknya dengan grey level
sebelumnya
o Grey
level yang jarang muncul bisa lebih dirapatkan jaraknya dengan grey level
sebelumnya
o Histogram
baru pasti mencapai nilai maksimal keabuan (contoh: 255)
Contoh gambar di bawah ini adalah
hasil generate histogram equalization yang jarak antar level grey dijarangkan
untuk mendapatkan hasil terbaik.
Proses dari Histogram Equalization
adalah sebagai berikut :
o Buat
Histogram derajat keabuan h(xg)
o Buat
distribusi kumulatif c(xg)
o Ambil
nilai derajat keabuan xg pada setiap titik, lalu ubah menjadi: 𝑥𝑏=(255.𝐶(𝑥𝑔)
)/(𝑛𝑥.𝑛𝑦)
o xg
adalah nilai derajat keabuan pada titik (x,y)
o c(xg)
adalah distribusi kumulatif dari xg
o nx
dan ny adalah lebar dan tinggi gambar
Source
Code dan Penjelasan
btnLoad_Click_1
private void
btnLoad_Click(object sender, EventArgs e)
{
DialogResult d =
openFileDialog1.ShowDialog();
if (d == DialogResult.OK)
{
bmp = new Bitmap(openFileDialog1.FileName);
pictureBox1.Image = bmp;
}
}
|
source code di atas terdapat pada tombol btnLoad.
Fungsinya adalah untuk menampilkan dialog box open file. Yaitu untuk mencari
gambar dan memasukkan gambar tersebut ke pictureBox1.
Teknisnya saat btnLoad di-click, maka langkah
pertama adalah membuat objek DialogResult
yang akan mengembalikan nama file yang diinginkan. Cara mengakses nama file
adalah openFile Dialog1.FileName. Kemudian file tersebut yang akan dijadikan
objek bitmap, dan bitmap ini nantinya akan ditampilkan dalam objek pictureBox1.
void
applyGreyscale(PictureBox picture)
public void
applyGreyscale(PictureBox picture){
bmpCopy= new Bitmap(bmp);
Color w, newColor;
float[] h = new
float[256];
int i;
for (i = 0; i < 256; i++) h[i] =
0;
for (int
x = 0; x < bmp.Width; x++)
for (int
y = 0; y < bmp.Height; y++)
{
w = bmp.GetPixel(x, y);
int
xg = (int)((w.R + w.G + w.B) / 3);
newColor = Color.FromArgb(xg, xg, xg);
bmpCopy.SetPixel(x, y,
newColor);
h[xg] = h[xg] + 1;
}
picture.Image = bmpCopy;
for(i=0;i<256;i++)
{
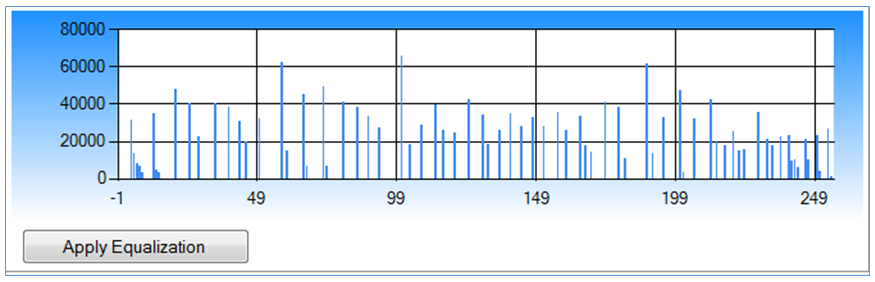
chart1.Series["Series1"].Points.AddXY(i, h[i]);
}
}
|
void
applyEqualization(PictureBox picture)
public void
applyEqualization(PictureBox picture)
{
float[] h = new
float[256];
float[] c = new
float[256];
float[] z = new
float[256];
int i, xg, xb;
Color w, wb;
for (i = 0; i < 256; i++) h[i]=0;
for (int
x = 0; x < bmp.Width; x++)
{
for (int
y = 0; y < bmp.Height; y++)
{
w = bmp.GetPixel(x, y);
xg = (int)((w.R + w.G + w.B) / 3);
h[xg] = h[xg] + 1;
}
}
c[0] = h[0];
for(i=1;i<256;i++)
c[i]=c[i-1]+h[i];
bmpCopy = new Bitmap(bmp);
int nx = bmp.Width;
int ny = bmp.Height;
for (int
x = 0; x < bmp.Width; x++)
for
(int y = 0; y < bmp.Height; y++)
{
w = bmp.GetPixel(x, y);
xg = (int)((w.R
+ w.G + w.B) / 3);
xb = (int)(255*c[xg]/nx/ny);
wb = Color.FromArgb(xb,xb,xb);
bmpCopy.SetPixel(x,y,wb);
z[xb] = z[xb] + 1;
}
picture.Image = bmpCopy;
for (i = 0; i < 256; i++)
{
chart2.Series["Series1"].Points.AddXY(i,
z[i]);
}
}
|
void
applyAutolevel
public void
applyAutoLevel(PictureBox picture)
{
float[] h = new
float[256];
bmpCopy = new Bitmap(bmp);
Color w, newColor;
float konstanta = (int)Convert.ToSingle(1
/ 3);
int xgmax = 0;
int xgmin = 255;
int i;
for (i = 0; i < 256; i++) h[i] =
0;
for (int
x = 0; x < bmp.Width; x++)
for (int
y = 0; y < bmp.Height; y++)
{
w = bmp.GetPixel(x, y);
int xg = (int)((w.R + w.G +
w.B) / 3);
if (xg > xgmax) xgmax = xg;
if
(xg < xgmin) xgmin = xg;
}
for (int
x = 0; x < bmp.Width; x++)
for (int
y = 0; y < bmp.Height; y++)
{
w = bmp.GetPixel(x, y);
int xg = (int)((w.R + w.G +
w.B) / 3);
int xb = (int)(255 * (xg -
xgmin) / (xgmax - xgmin));
newColor = Color.FromArgb(xb, xb, xb);
bmpCopy.SetPixel(x, y,
newColor);
h[xb] = h[xb] + 1;
}
picture.Image = bmpCopy;
for(i = 0; i < 256; i++)
{
chart4.Series["Series1"].Points.AddXY(i,
h[i]);
}
}
|
void
applySpesificEqualization
public void
applySpesificEqualization(PictureBox
picture, int xAsal, int yAsal, int width, int height)
{
float[] h = new
float[256];
float[] c = new
float[256];
int i, xg, xb;
Color w, wb;
bmpCopy = new Bitmap(bmp);
for (i = 0; i < 256; i++) h[i] =
0;
for (int
x = 0; x < bmp.Width; x++)
for (int
y = 0; y < bmp.Height; y++)
{
w = bmp.GetPixel(x, y);
xg = (int)((w.R + w.G + w.B) / 3);
wb = Color.FromArgb(xg, xg, xg);
bmpCopy.SetPixel(x, y,
wb);
h[xg] = h[xg] + 1;
}
picture.Image = bmpCopy;
c[0] = h[0];
for (i
= 1; i < 256; i++) c[i] = c[i - 1] + h[i];
int nx = bmp.Width;
int ny = bmp.Height;
for (int
x = xAsal; x < width; x++)
for (int
y = yAsal; y < height; y++)
{
w = bmp.GetPixel(x, y);
xg = (int)((w.R + w.G + w.B) / 3);
xb = (int)(255 * c[xg] / nx / ny);
wb = Color.FromArgb(xb, xb, xb);
bmpCopy.SetPixel(x, y,
wb);
}
picture.Image = bmpCopy;
}
|
Screenshoot
dan Analisa
Ini adalah tampilan program saat
baru load gambar dari komputer. Gambar ini kemudian akan diolah menjadi objek
bitmap, kemudian akan ditampilkan ke dalam sebuah PictureBox yang screenshootnya
seperti contoh gambar di samping.


Jadi histogram di atas sangat membantu untuk melihat kombinasi warna yang ada pada sebuah gambar. Hasil ini bisa digunakan untuk menentukan keputusan sesuai keperluan, apakah citra nantinya akan diolah menjadi invers, autolevel, brightness dan lain sebainya
[Tutorial belum lengkap - to be continued]
Yah, sampai di sini dulu tutorialnya. Capek sekali jari saya. hehe
Jika sampai anda membaca tutorial ini belum lengkap dan anda ingin tutorial lengkapnya, silakan komentar atau email ke arief_eepis@windowslive.com terima kasih.